Orchid Greenhouse / Shadehouse Irrigation System Installation
';
// echo $lgrectATFBrtBlue;
// echo '';
?>
During our annual spring drought, and with some of my orchids
potted in lava rock and aliflor, I can barely keep up with watering them, so
I installed some sprayers on an automatic timer, which fill the
green house with mist a couple of times a day.
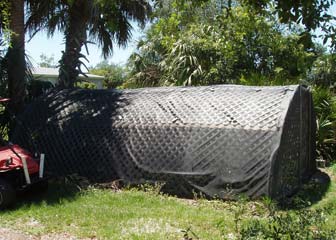
Actually, it's not a greenhouse, but I still call it by that name. Since
Hurricane Charlie blew away all my shade, I turned my greenhouse into a
shade house by putting wood lattice and screen over the metal frame of the
greenhouse. Here's a picture of it.
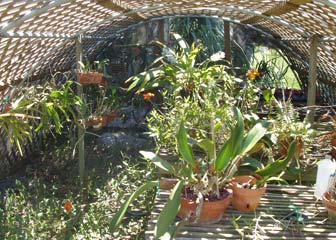
A Peek Inside My Greenhouse
Here's a look inside at my orchids.
Some of the orchids are hanging in wood basket hanging planters, some are on orchid
benches, and others are hung on 2x2 pieces of pressure treated wood hung
from the steel frame of the greenhouse/shadehouse with chains. I put pot
clips along the 2x2's to hold the clay orchid pots.
My plan was to cover the east side of the greenhouse/shadehouse with mist,
and cover each table with mist, at least for now. Later, the calanthe
orchids will want drip irrigation, and I'll install a network of small
lead-weighted drippers on a few of the orchid benches. For now, a blast of
mist a couple of times a day will help them through springtime, Florida's dry time of year.
Supplies Needed for An Orchid Greenhouse Irrigation System
I went to Home Depot for sprayers, the small irrigation tubing to feed each sprayer or cluster of sprayers,
connectors for that size tubing, 1/2" black plastic irrigation
hose to serve as a feeder running around the circumference of the
greenhouse/shadehouse, and a pressure regulator and connector for that hose.
I already had a RainSoft automatic irrigation timer, which had been sitting
in my shop for years, waiting to be used.
Planning the Irrigation System
The first step was to decide how I wanted to hook up the automatic timer to
the garden hose faucet. I knew I would still want a hose down there, so I
bought a nice bronze hose splitter and hooked up the timer to one side, with
the pressure regulator on the outlet side. I hooked up the black plastic
irrigation tubing and ran it around the shadehouse, then poked holes in it
and snapped in the barb connectors for the small tubing where they would be
needed.
The sprayers I bought came with little plastic spikes meant to be driven
into the ground, but that was not going to work for me. I got some plastic
wire ties to attach the sprayer spikes to the frame of the shadehouse, the
wood lattice, or the hanging chains. The mist pattern on the ones I bought
fans out 90 degrees or 180 degrees from the spray emitter.
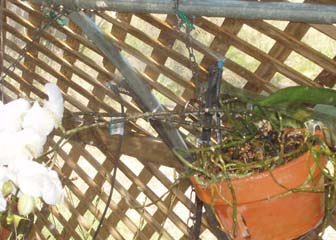
Here's a picture of the east side of the greenhouse, where I have the
hanging plants and the ones hanging from wood with orchid pot clips, showing
how I tied the 180 degree misting sprayers to the frame of the greenhouse
and the hanging chain with wire ties.
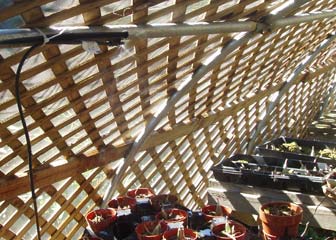
On the other side, where the idea was to cover the benches, I tied the
sprayer to the cross brace of the shade house frame so that it would cover
the whole bench with mist. Here's a picture of that.
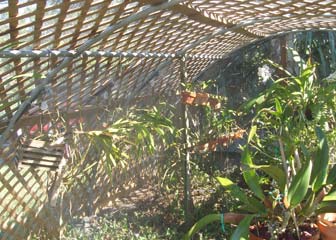
And here's a shot from the other end of the greenhouse, showing the sprayers
covering the hanging orchids with a cloud of mist.
The automatic timer has far more options than I will need. I set it for a
couple of two minute cycles during the warm part of the day, when the shade
house can get pretty warm, and I set one more two minute cycle for later in
the day. The epiphytes will love it, and the terrestrial orchids will be OK
with it for now. The Vandas are going to like it best of all. They have been
thirsty, and it is impossible to over-water a Vanda orchid at this time of
year. Installing my automatic irrigation system was an afternoon well spent in the greenhouse/shadehouse.